Tutorial: Your personal Wiki with Linny.vim and Carl
May 3, 2021
Introduction #
This is a short tutorial to get you started with Linny.vim and Carl. Linny.vim is a Personal Wiki and Document database inside Vim. It helps you organize all your markdown files using a smart navigation menu that is configured with yaml and which reads index files.
The index files contain useful summaries generated by an indexer. We need the indexer to maintain speed. In theory Vim could do the same but this would kill all performance. We will setup Carl to create the index files.
Requirements #
For this tutorial you need up to date versions of Vim and Hugo. This tutorial is for Mac, Linux and BSD users. Sorry Windows people.
You need to have basic Vim knowledge and know how to install plugins.
Setup Carl #
To install and run Carl you must clone the git repo. Run the following:
git clone https://github.com/linden-project/carl ~/MyWiki
cd ~/MyWiki
The configuration of Carl is located at config/_default/config.yaml. Most
settings need to be kept, but the settings below can be modified to your needs.
contentDir: wikiContent
dataDir: wikiConfig
publishDir: wikiIndex

taxonomies:
  tag: "tags"
  project: "projects"
  customer: "customers"
Run the carl indexer #
We will use the default Carl configuration for now. So lets start the engines…
Open a new terminal and run the command below.
hugo server \
  --renderToDisk \
  --ignoreCache \
  --forceSyncStatic \
  --cleanDestinationDir \
  --disableFastRender
The above command tell’s hugo to start as server daemon, but to write every change to the configured directories.
Setup Linny.vim #
We can now install and configure linny.vim in vim. I use junegunn/vim-plug. To install linny.vim, add
Plug 'linden-project/linny.vim'
And afterward run PlugInstall. Ignore the error messages.
Configure the Wiki paths #
We have to tell Linny.vim where the markdown files are stored and where the index is located. Finally we ask linny to initialize.
Add below to your vimrc
let g:linnycfg_path_wiki_content     = $HOME . '/MyWiki/wikiContent'
let g:linnycfg_path_wiki_config      = $HOME . '/MyWiki/wikiConfig'
let g:linnycfg_path_index            = $HOME . '/MyWiki/wikiIndex'

call linny#Init()
Restart Vim to be sure everything is loaded correctly. Fire up the Linny menu to check if everything is working.
:LinnyMenuOpen
Press 1 afterwards.
First Steps in Linny.vim #
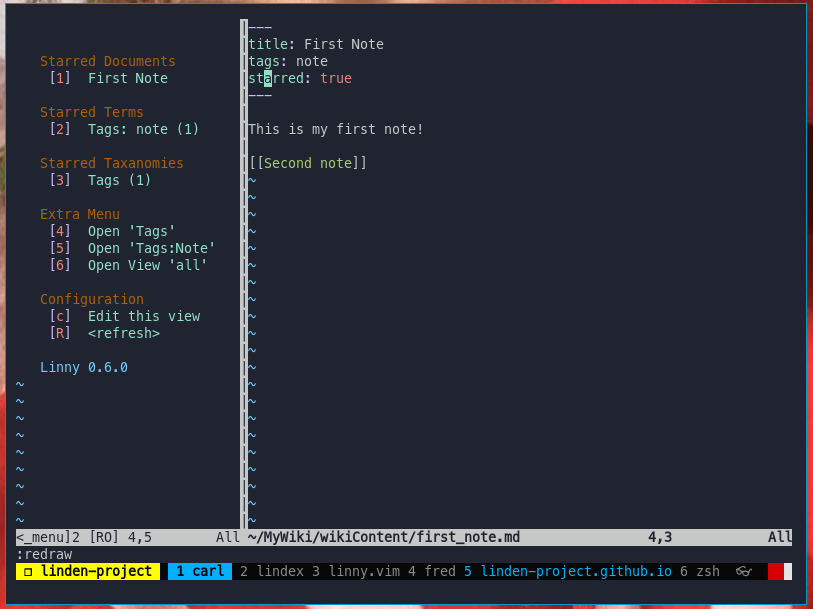
When you see the menu on the left side everything worked as it should. It should look like this:

With the menu open you can use the cursor to navigate. You can also use the number and letter keys listed before the menu items.
Adding documents #
Inside a document you can add a wiki link between two square brackets. E.g.
This is a link to [[My first document]].
Afterwards move your cursor above the link and click enter. A new document will be created.
Another way of creating a document is browsing to a term. E.g. Tags -> Note.
When you’re located in the term menu, you can click A. You’ll be asked
to enter a new name and it will be created with the term tags: note in
the Front Matter.
The last method to create a new document is to execute the ex-command :LinnyNewDoc
You can allways press R to refresh the Linny.vim menu.
NOTE: Sometime the index files are not updated automatically. Restart the hugo process to fix this problem. This behaviour should be fixed soon.
Configure views #
There are three types of menu views:
- root view and custom views
- taxonomy views
- term views
The root view is the opened when the Linny menu is opened for first time. You
can always go back to the root by clicking 0 inside the menu window.
You can edit this view clicking “Edit this view” at the bottom of the menu. It
looks like this:
---
widgets:

  - title: Starred Documents
    type: starred_documents
    hidden: false

  - title: Starred Terms
    type: starred_terms
    hidden: false

  - title: Starred Taxanomies
    type: starred_taxonomies

  - hidden: false
    title: Extra Menu
    type: menu
    items:
      - title: Open 'Tags'
        execute: call linny_menu#openterm('tags', '')
      - title: Open 'Tags:Note'
        execute: call linny_menu#openterm('tags', 'note')
      - title: Open View 'all'
        execute: call linny_menu#openview('all')
You can change the order, the titles, and also add more menu items. Checkout wikiConfig/views/all.yml for all available view components.
Changing Taxonomies. #
You can modify your taxonomies in config/_default/config.yaml, Restart your
Hugo process afterwards. The taxonomy should now be listed in the Linny.vim
menu all_taxonomies.
Conclusion #
Thanks for reading this tutorial. I hope this gets you started and I hope Linny.vim can be of use for you. If you have questions, or encounter problems, please submit an issue in the linny.vim or Carl issue tracker. Or send me a twitter DM at @mipselaer.
PS. If you see typo’s or very bad English or if you have other suggestions … please help me improve this tutorial, by clicking the link Edit this page